


We do.
Sorta.
Actually, "real" perogies are little half-moon shapes of dough, filled with any sort of filling, from fruit to meat, boiled in water, and end up looking like this:
 But the perogies we make are baked, not boiled, and filled with the one-and-only filling: sausage. :)
They look more like this:
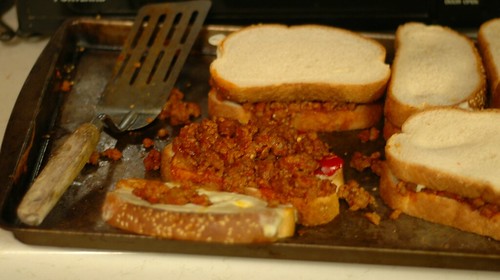 But you have to ignore the white bread part, because we use our own dough, and we don't make it in a nice little loaf and then slice it - instead, we make special perogie buns, and then top it with our sauce-sausage mixture.
 Now, to explain why I'm writing about perogies.
One of my readers, a dear friend of mine, caught my little reference to perogies several posts back, and asked me to share the recipe. I just thought I ought to make a disclaimer at the beginning, and say yes, I realize that the recipe I'm about to give you doesn't make a typical perogie. But we like it anyway. :) I warn you; it's entirely written down from memory, simply because it's never been written down. You're about to read a "secret" family recipe, recorded in writing for the first time!
Our Perogies
2 cups warm water
1 TBS brown sugar
2-1/2 tsp dry yeast
a few tsp. ground flax seed (to taste) *optional*
1/4 cup oil or melted butter
4-5 cups white whole wheat flour
These ingredients are for the dough. You'll need to start this several (about 3) hours before you want to eat.
Dissolve sugar in warm water, then stir in yeast and let sit for 5 minutes. If the yeast starts to give off a yeasty smell, and bubbles a little, you have good yeast and can proceed. (If you get neither smell nor bubbles, your yeast has gone bad, and your dough will not rise.) Add in your flax seed and 1 cup of flour. Stir in very well - you want to start activating the gluten in the flour. Next add the butter, and stir well. Add the rest of the flour a cup at a time, stopping when the dough makes a good ball, and you can pick it up without it oozing out between your fingers, but don't add so much flour that it is no longer sticky.
Now knead the dough until it's smooth and elastic. Put in a lightly oiled bowl and let rise for 1 hour in a draft-free place. (I use in the inside of our oven - on OFF, of course!)
When dough has risen, punch down and divide evenly with a knife into 12 or 24 sections, depending on how big you want your servings to be. When I make the perogies into little tarts, I divide the dough into 24 sections, but when we're doing big hot dog-bun type servings, I go with 12. You decide!
If you're making little tarts, grease some muffin tins. If you're going to do the hot dog shape, grease two 9x18 glass casserole dishes. I recommend the hot dog shape, simply because it's MUCH easier and less time consuming. But the tarts are cute and look nice, if you're doing a party or something.
Make the appropriate shapes and set into their pans, leaving space for expansion. For hot dog shapes, just make 12 "logs" and put six in each pan, and for tarts, line each muffin tin with "pie crusts."
Let rise for 30-40 minutes, and bake in a preheated 350* oven for 20-25 minutes. While they are baking, mix 1 large can of pasta sauce and lots of Italian sausage links (chopped into 1/2" pieces) in a sauce pan on the top of the stove, and let heat. Add your favorite spices, if desired, like oregano, sweet basil, garlic powder, or onion powder.
Can you tell this is not a recipe that is written down? Just add what sounds good. :)
When your bread is finished baking, let it cool for about 5 minutes, then slice it open. If you made logs, just cut them open down the middle like a hot dog bun. If you made tarts, you will probably find that they expanded as they baked, and are now baked shut. Just cut out little "plugs" of bread from the middle, and give yourself a well to fill up.
Fill the tarts, or tip the hot dog buns sideways (still in the pans) and fill with the sausage/sauce mixture. Top with lots of shredded mozzarella cheese, and put back in the oven just long enough for the cheese to melt.
That's it! Remove from oven to plates, and eat while hot. Enjoy!


.gif)


1 comment:
Thanks for the recipe Amber. I would like to try it sometime soon. Hopefully it will go well even though I'm not experienced with making any of my own bread. I know I've been missing out on that one!
Keep up the good work on your blog. I always enjoy reading it!
Ms. Angie
Post a Comment